
Administer WordPress using Django's Admin
I recently came across one feature of Django that seemed pretty useful for one off projects and customizations and was startled because it’s one of Django’s least mentioned features. In fact, I’ve been using Django at work for over 5 years now and didn’t hear of it until this last week.
This feature is the manage.py command inspectdb which inspects the tables in
an existing database and creates Python code defining the Django models for
those tables. We had a use case at work where we had a database table that was
not managed as a Django model, but we wanted to create tests interacting with
that table. The solution was to use inspectdb to create a models.py file in
a test application and add that application to INSTALLED_APPS when running
tests. That way the table is created via syncdb when the tests are run, and we
can use the model to create/check test data.
One of my other co-workers mentioned that inspectdb could be used to create
Django models for an entirely different system not written in Python, say
WordPress, and very easily create Django admin for that
system. So I decided to try just that. I would create a WordPress database, use
inspectdb on that database, and create a very simple alternative admin for
WordPress.
Let’s get started.
Initializing the Project
I’m going to assume you have WordPress installed and the database set up so I won’t provide any instructions on how to install WordPress here. You can check out how to install the latest WordPress on the WordPress homepage: Installing WordPress
Also, I’ve created a repository on github so that you can try out this code without having to copy and paste everything. It’s located here: https://github.com/IanLewis/wordpress_django_admin
First we are going to create a Django project for our WordPress admin. Django 1.5 will be released soon but this project is going to use 1.4, which is the latest stable version as of this writing.
First we’ll install Django (As we should be doing with all Python projects, you’ll want to be using virtualenv):
pip install Django
We’ll also need to install the appropriate database driver library. For MySQL
it’s mysql-python:
pip install mysql-python
After that we’ll start a project using django-admin.py:
django-admin.py startproject wordpress_admin
Next, let’s edit the settings.py. We’ll need to add settings for how to
connect to the database. You’ll need to set this correctly so that Django can
connect to your wordpress database. We will be putting the Django tables that we
need in a separate database so you’ll need to create that database separately.
DATABASES = {
    'default': {
        'ENGINE': 'django.db.backends.mysql',
        'NAME': 'wordpress_admin',
        'USER': 'root',
        'PASSWORD': '',
        'HOST': '',
        'PORT': '',
    },
    'wordpress': {
        'ENGINE': 'django.db.backends.mysql',
        'NAME': 'wordpress',
        'USER': 'root',
        'PASSWORD': '',
        'HOST': '',
        'PORT': '',
    },
}
Set up your INSTALLED_APPS to include the Django admin and our wordpress app
that we’ll create in a few moments:
INSTALLED_APPS = (
    'django.contrib.auth',
    'django.contrib.contenttypes',
    'django.contrib.sessions',
    'django.contrib.sites',
    'django.contrib.messages',
    'django.contrib.staticfiles',

    # Django Admin
    'django.contrib.admin',
    'django.contrib.admindocs',

    # Our wordpress app
    'wordpress',
)
Next is urls.py. We only need the Django admin here:
from django.conf.urls import patterns, include, url

# Django Admin
from django.contrib import admin
admin.autodiscover()

urlpatterns = patterns('',
    # Django Admin
    url(r'^admin/doc/', include('django.contrib.admindocs.urls')),
    url(r'^admin/', include(admin.site.urls)),
)
Create the wordpress application
Next we’ll create a wordpress application to hold our Django models. Let’s do
that now:
python manage.py startapp wordpress
Now, here’s the fun part. We’re going to use the real WordPress database to create our Django models.
python manage.py inspectdb --database=wordpress > wordpress/models.py
You can now inspect the wordpress/models.py and take a look at the generated
models. It will look something like the following:
# This is an auto-generated Django model module.
# You'll have to do the following manually to clean this up:
#     * Rearrange models' order
#     * Make sure each model has one field with primary_key=True
# Feel free to rename the models, but don't rename db_table values or field names.
#
# Also note: You'll have to insert the output of 'django-admin.py sqlcustom [appname]'
# into your database.

from django.db import models

class WpCommentmeta(models.Model):
    meta_id = models.BigIntegerField(primary_key=True)
    comment_id = models.BigIntegerField()
    meta_key = models.CharField(max_length=765, blank=True)
    meta_value = models.TextField(blank=True)
    class Meta:
        db_table = u'wp_commentmeta'

class WpComments(models.Model):
    comment_id = models.BigIntegerField(primary_key=True, db_column='comment_ID') # Field name made lowercase.
    comment_post_id = models.BigIntegerField(db_column='comment_post_ID') # Field name made lowercase.
    comment_author = models.TextField()
    comment_author_email = models.CharField(max_length=300)
    comment_author_url = models.CharField(max_length=600)
    comment_author_ip = models.CharField(max_length=300, db_column='comment_author_IP') # Field name made lowercase.
    comment_date = models.DateTimeField()
    comment_date_gmt = models.DateTimeField()
    comment_content = models.TextField()
    comment_karma = models.IntegerField()
    comment_approved = models.CharField(max_length=60)
    comment_agent = models.CharField(max_length=765)
    comment_type = models.CharField(max_length=60)
    comment_parent = models.BigIntegerField()
    user_id = models.BigIntegerField()
    class Meta:
        db_table = u'wp_comments'

# <snip>
Next, we need to register the models with Django’s admin. This is a bit of a
pain as it requires some hand coding. Save this in wordpress/admin.py:
from django.contrib import admin
from wordpress.models import (
    WpCommentmeta,
    WpComments,
    WpLinks,
    WpOptions,
    WpPostmeta,
    WpPosts,
    WpTermRelationships,
    WpTermTaxonomy,
    WpTerms,
    WpUsermeta,
    WpUsers,
)

admin.site.register(WpCommentmeta)
admin.site.register(WpComments)
admin.site.register(WpLinks)
admin.site.register(WpOptions)
admin.site.register(WpPostmeta)
admin.site.register(WpPosts)
admin.site.register(WpTermRelationships)
admin.site.register(WpTermTaxonomy)
admin.site.register(WpTerms)
admin.site.register(WpUsermeta)
admin.site.register(WpUsers)
Database Routing
We’re going to be using multiple databases so let’s create a database router to tell Django which tables live it which database. We’ll be lifting this code strait from an example from the Django docs (See: Multiple databases)
Let’s put this in wordpress_admin/router.py:
class WordPressRouter(object):
    """A router to control all database operations on models in
    the wordpress application"""

    def db_for_read(self, model, **hints):
        "Point all operations on wordpress models to 'wordpress'"
        if model._meta.app_label == 'wordpress':
            return 'wordpress'
        return None

    def db_for_write(self, model, **hints):
        "Point all operations on wordpress models to 'wordpress'"
        if model._meta.app_label == 'wordpress':
            return 'wordpress'
        return None

    def allow_relation(self, obj1, obj2, **hints):
        "Allow any relation if a model in wordpress is involved"
        if obj1._meta.app_label == 'wordpress' or obj2._meta.app_label == 'wordpress':
            return True
        return None

    def allow_syncdb(self, db, model):
        "We don't create the wordpress tables via Django."
        return model._meta.app_label != 'wordpress'
Next we’ll add the following to our settings.py:
DATABASE_ROUTERS = ('wordpress_admin.router.WordPressRouter',)
Create the Django Database
We’ll need to create a database on the Django side of things so we’ll do something like this:
echo "CREATE DATABASE wordpress_admin CHARACTER SET utf8;" | mysql -u root
Replace the appropriate mysql options with those for your database.
Next we’ll run syncdb:
$ python manage.py syncdb
Error: One or more models did not validate:
wordpress.wpposts: "id": You can't use "id" as a field name, because each model automatically gets an "id" field if none of the fields have primary_key=True. You need to either remove/rename your "id" field or add primary_key=True to a field.
wordpress.wpterms: "slug": CharField cannot have a "max_length" greater than 255 when using "unique=True".
You’ll notice that a couple of models didn’t validate. So we’ll need to update
them. The first WpPosts needs it’s id field updated. Since it’s the primary
key we can just add the primary_key keyword to it:
class WpPosts(models.Model):
    id = models.BigIntegerField(db_column='ID', primary_key=True) # Field name made lowercase.
    # <snip>
The WpTerms model’s slug field can’t have a unique=True index with a field
larger than 255 in Django. Since we aren’t really doing that much with the field
we can simply remove the unique keyword.
class WpTerms(models.Model):
    term_id = models.BigIntegerField(primary_key=True)
    name = models.CharField(max_length=600)
    slug = models.CharField(max_length=600)
    # <snip>
Now we’ll run syncdb again and this time it should create our Django tables
for us:
python manage.py syncdb
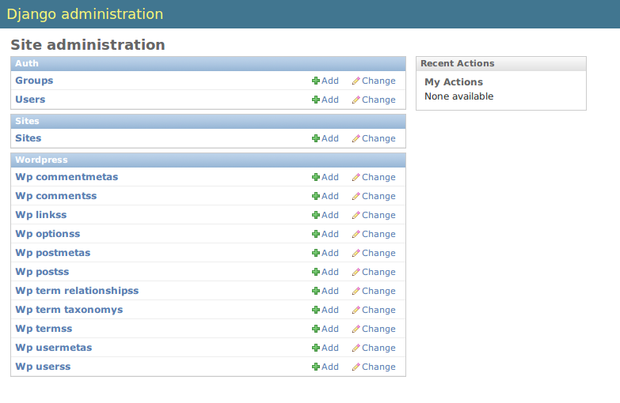
Start the Server
Now we can start the server and view our admin at
http://localhost:8000/admin/:
python manage.py runserver
You’ll need to login to view the admin. One thing to note is that for the Django
admin we authenticate with the Django user we created when running syncdb for
the first time and not WordPress’s users.
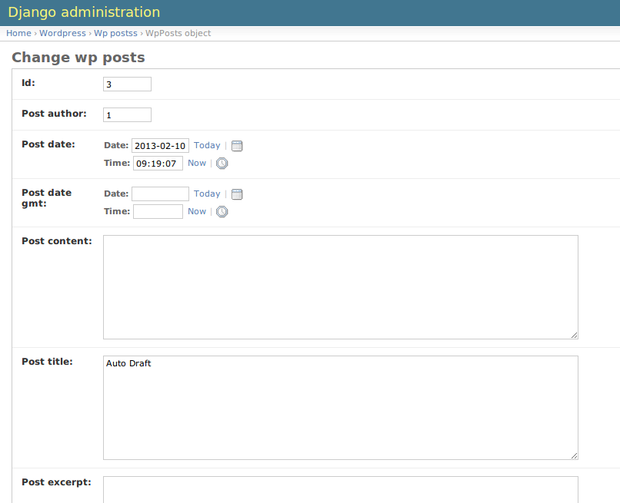
Here’s what editing a post looks like:
Conclusion
I hope you realized some of the interesting things you can do with the
inspectdb command. We didn’t really have to use WordPress. We could just as
easily have used any database application, like
Redmine or Bugzilla.
There’s also an endless amount of customization you could do using the Django
admin to provide a richer experience. You can get started by reading the Django
docs for the admin: The Django admin
site. Have fun!