
Google Cloud Platform HTTP Load Balancers Explained via the CLI
The Google Cloud Platform Load Balancers are based off of technology that Google developed for our applications. There are two types of load balancers, the Network (L3) Load Balancer and the HTTP (L7) Load Balancer. The HTTP Load Balancer is global so the same IP can be used everywhere in the world, but still supports very high scalability with no warmup.
Setting up the HTTP Load Balancer is fairly straightforward in the Developers Console. You can create one in the Networks section of the console and create a load balancer. Once you’ve started creating an HTTP Load Balancer, you get a page something like this:
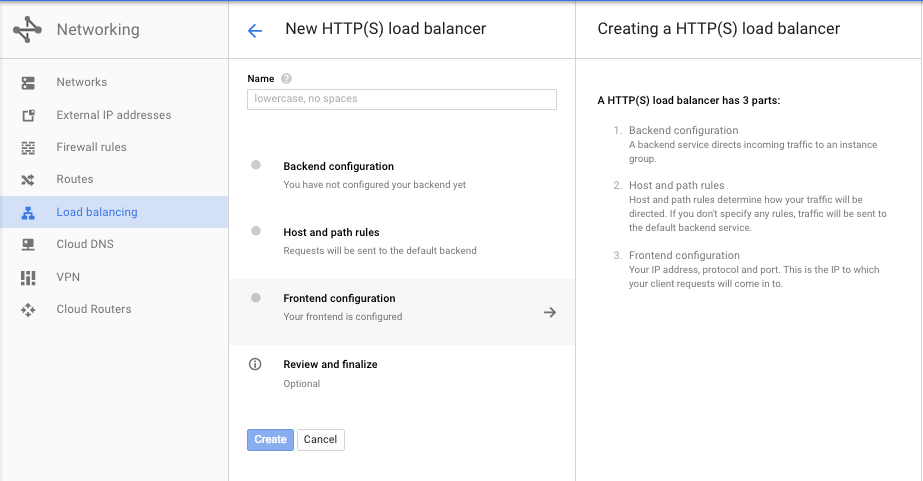
Each of the sections is nicely laid out and allow you to create the load balancer all at once. But there are many objects being created under the covers here, many of which only vaguely map to the UI. It can be a bit daunting to set up via the the Google Cloud CLI.
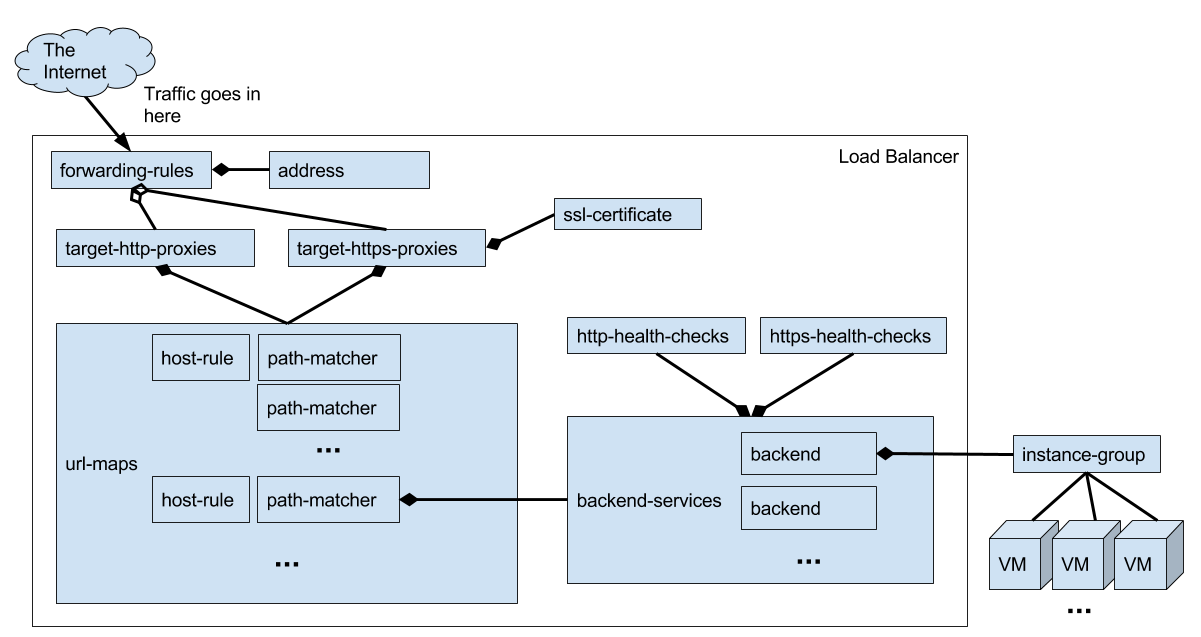
The HTTP Load Balancer documentation has some good info and diagrams that help understand how it works. But I found the diagram there to be a bit too simplistic when I wanted to set up the load balancer via the CLI. I needed to know a bit more about all the parts so I came up with this diagram.
Let’s go step by step through how to create the load balancer via the CLI. As we do that, I’ll try to point out what each of the objects we are creating correspond to in the Cloud Console so you have an idea where to look for them later.
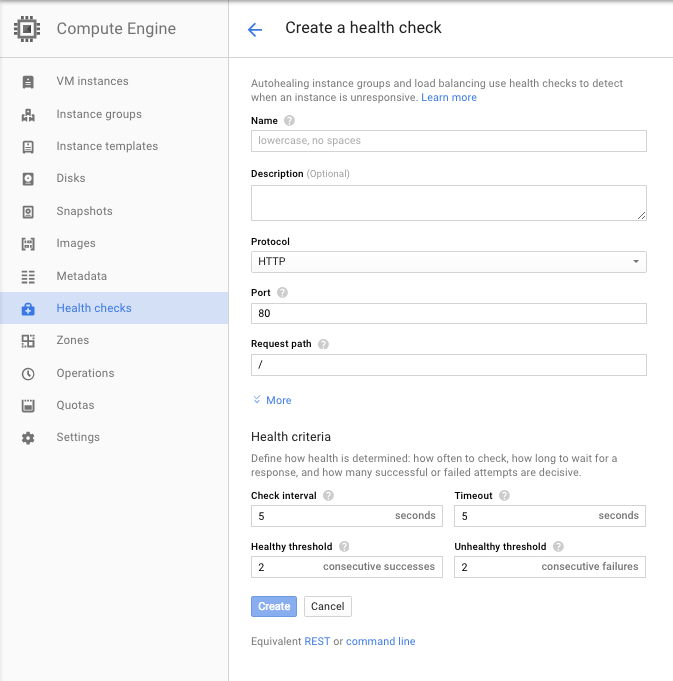
Health Checks
Since most of the objects depend on one another, we will need to go from “back” to “front” starting with health checks and backend services and ending with forwarding rules. The health check object doesn’t depend on anything else so we can create it first. Even though we create the object here, it only really becomes active after we attach it to a backend service.
gcloud compute http-health-checks create my-healthcheck \
  --host www.example.com \
  --port 80 \
  --request-path=/healthz
Here we create a health check that will connect to our app via port 80 at the
/healthz URL. Note that creating the health check only tells further
configuration the port and path to check but doesn’t actually send the health
checks. The host parameter isn’t actually used as the host to connect to but
only to set the Host header. Some apps check this header so we want them to
be able to return a successful status. The instances to health check are
specified later by the backend service.
Health checks are used in more than one place so they live under the Compute
Engine part of the Cloud Console UI. The health checks listed here are the what
correspond to http-health-checks and https-health-checks in the CLI.
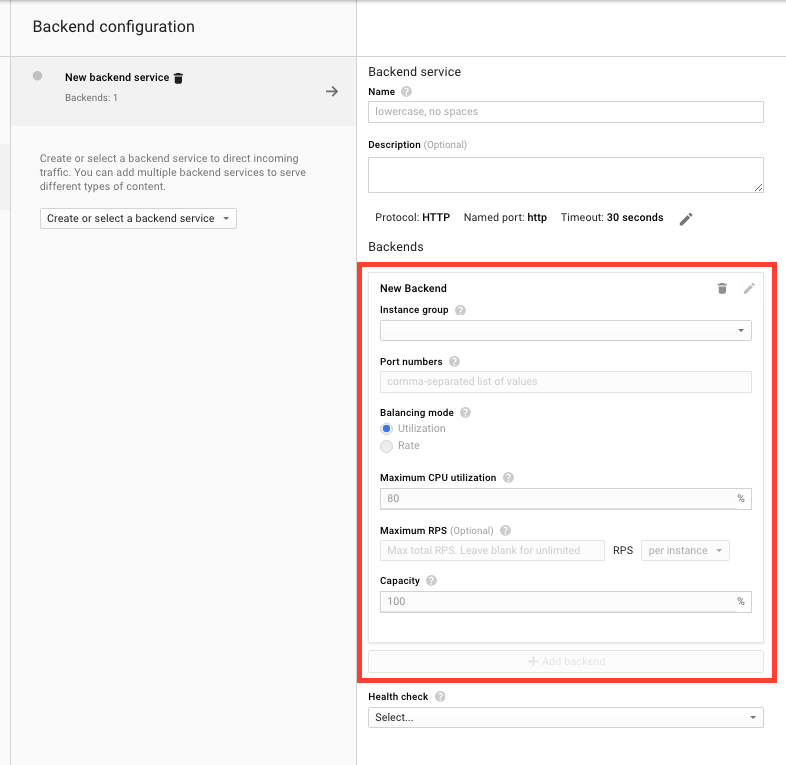
Backend Services
Next we’ll create a Backend Service. A backend-service object defines the
backend VMs that actually serve the requests. The Backend Service contains a
number of Backends. Each Backend is essentially a link to an instance group but
has some other options attached like which port numbers to use and load
balancing mode. The preferred way to set the port is via named ports on the
instance group. You can set a named port for port 80 called http-port using
the following command. I’m assuming you already have an instance group called
my-instance-group set up. You can find out more about creating managed
instance groups in the Compute Engine
docs.
gcloud compute instance-groups set-named-ports my-instance-group \
  --named-ports http-port:80
Next you can create the backend service:
gcloud compute backend-services create my-http-backend-service \
  --http-health-checks my-healthcheck \
  --port-name http-port \
  --protocol HTTP
Now that we have the health check attached to the backend service, it will connect to the instances specified by the backend service to do the health checks.
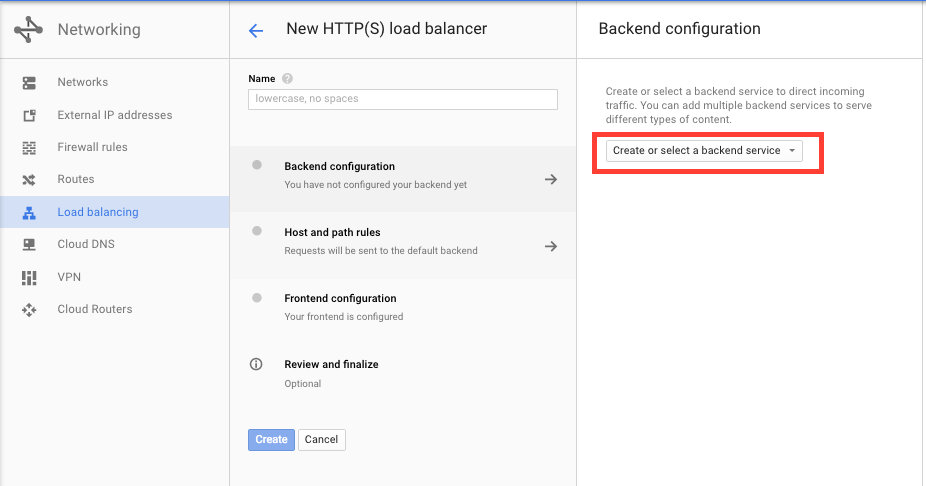
The UI shows backend-services in the “backend configuration” part of the UI.
Next we have to create a Backend. A Backend specifies the instance group you want to send traffic to, and how the load should be balanced among the available instances. You can create more than one backend and a backend is generally created one per instance group. You can use this to do cross-region load balancing for instance.
gcloud compute backend-services add-backend my-http-backend-service \
  --instance-group my-instance-group \
  --balancing-mode RATE \
  --max-rate-per-instance 10
This sets up a backend that sends traffic to my instance group and uses the request rate as a way to load balance. I am setting it so that each instance will get 10 requests per second maximum but you can also set this up to use CPU utilization based on your needs.
In the UI, backends are part of the backend service form. You can add any number of backends to the backend service just like can in the CLI.
Url Maps
Url maps are used to map hosts and urls to backend services. The url maps hold two types of objects, host rules and path matchers. Each host rule can have multiple path matchers. Each request is matched against the host rule and then the path matchers for the host rule that matches. When creating a url-maps object you specify the default backend service that is used when no host rules match.
gcloud compute url-maps create my-url-map \
  --default-service my-http-backend-service
If you have only one backend service then this one command is usually enough since all traffic can be sent via the default service. However if you have multiple backends you can set the up based on host or url. A host rule can have multiple path matchers but the host rule must have at least one path matcher so we create the path matcher and host rule at the same time.
gcloud compute url-maps add-path-matcher my-url-map \
  --path-matcher-name my-www-path-matcher \
  --new-hosts www.example.com \
  --default-service my-http-backend-service
You can specify that requests with a different host go to a separate backend service as well.
gcloud compute url-maps add-path-matcher my-url-map \
  --path-matcher-name my-api-path-matcher \
  --new-hosts api.example.com \
  --default-service my-api-backend-service
Like the url-maps itself you specify a default service if the host rule matches but no path rules match. You can also specify different backend services be used based on the path.
gcloud compute url-maps add-path-matcher my-url-map \
  --path-matcher-name my-path-matcher \
  --new-hosts www.example.com \
  --path-rules=”/api=my-api-backend-service,/other=my-other-backend-service” \
  --default-service my-http-backend-service
In the UI the URL maps, host rules, and path matchers are specified in the “Host and path rules” section.
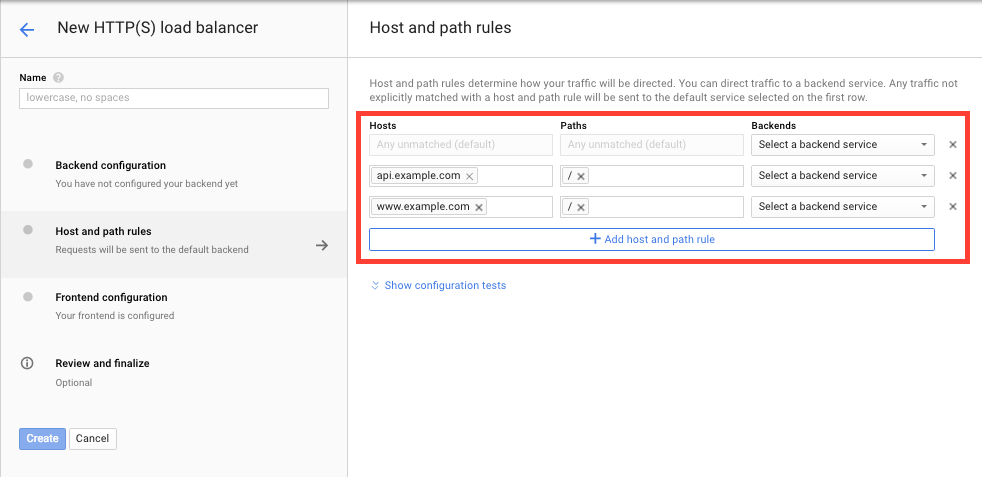
The first row contains the default service which is used when a request doesn’t match a host rule/path matcher combination. The other rows contain the host rule/path matchers.
Target Proxies
Target HTTP Proxies and Target HTTPS Proxies are objects that connect one or more forwarding rule to a URL map.
Target Proxies terminate the connection to the user so you specify the SSL certificate to use when you are using HTTPS. SSL certificates are created like so:
gcloud compute ssl-certificates create my-cert \
  --certificate /path/to/cert.pm \
  --private-key /path/to/key.pm
You can then use the certificate to create the HTTPS proxy.
gcloud compute target-https-proxies create my-https-proxy \
  --url-map my-url-map \
  --ssl-certificate my-ssl-certificate
You still need to create one but at this point I felt that Target Proxies made things more complicated than it needs to be since you almost always use one forwarding rule per target proxy for HTTP load balancers.
Forwarding Rule
Forwarding rules are final object we need to create. These are the objects that your are actually billed against. The Forwarding Rules map the IP address for your load balancer to the Target Proxy that will handle the requests. First we will need to create our IP address though. We will need a global, rather than regional, IP address for our HTTP load balancer.
gcloud compute addresses create my-address --global
Then we can create our forwarding rule. Notice that we will need to put in the
actual IP address that we just created rather than the IP address name. Not
also that you can only put a single port as the --port-range option and that
we need to add the --global option.
gcloud compute forwarding-rules create my-https-forwarding-rule \
  --global \
  --address 123.123.123.123 \
  --ip-protocol TCP \
  --port-range 443 \
  --target-https-proxy my-https-proxy
Many applications will want to redirect users that access http://www.example.com/ to https://www.example.com/. This is a pretty common use case that is not supported by the load balancer. You need to create a totally separate Target HTTP Proxy and Forwarding Rule for HTTP. You essentially need to have two load balancers to handle the traffic, and then actually redirect users in your application.
Notice that we put the same IP address in for the HTTP Forwarding Rule. This makes is so that we can listen on port 80 and on port 443 at our IP address.
gcloud compute target-http-proxies create my-http-proxy \
  --url-map my-url-map
gcloud compute forwarding-rules create my-http-forwarding-rule \
  --global \
  --address 123.123.123.123 \
  --port-range 80 \
  --target-http-proxy my-http-proxy
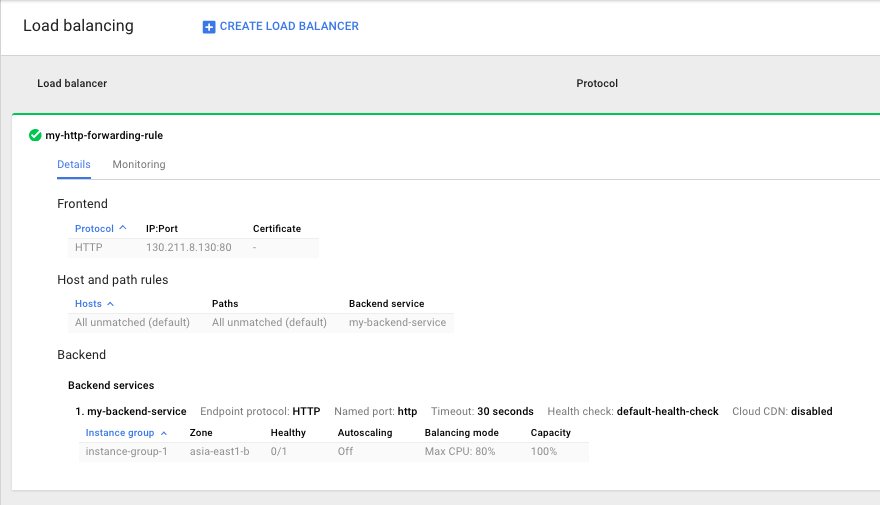
Now that you’ve created a forwarding rule, it will show up in the “Load balancing” section of the developers console.
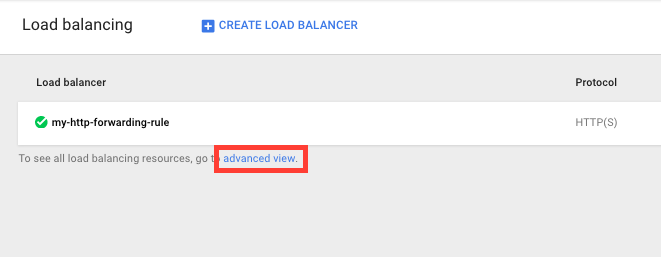
The Advanced View
There is also an “Advanced View” that allows you to view the objects in a format that is much closer to the CLI counterparts. There are tabs for each of the major objects as well as a couple for the network load balancers.
The objects that make up the HTTP(S) Load Balancer and the commands that you need to run to set it up on GCP are not totally obvious given how you create a in the UI. But hopefully this post has shed some light on how they map together. Be sure to also check out the HTTP Load Balancer documentation it has lots more info and guides like how to do some more complex setups like cross-region load balancing and content based load balancing.