
Performing Maintenance on Pods
Kubernetes includes a feature called services which serve as a kind of load balancer for pods. When pods misbehave or otherwise stop working, sometimes you’ll want to remove the pod from the service without killing the pod.
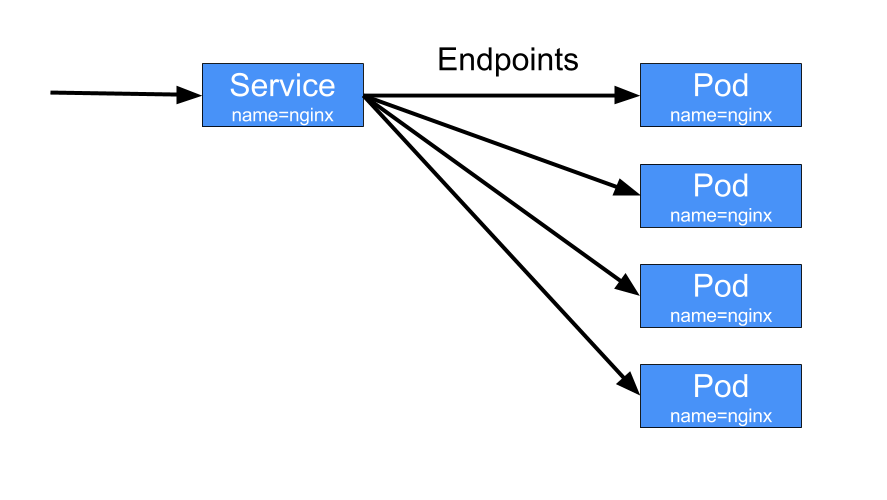
Services & Endpoints
Each service has a list of endpoints for the service which correspond to the pods for that service. This list of endpoints is updated automatically with the IPs and ports for the pods based on a label selector defined on the service. This allows the service to be loosely coupled to the pods themselves. You can see the selector pattern used in many other Kubernetes components like Deployments and ReplicaSets.
Because the list of endpoints is updated automatically based on the label selector, we take take misbehaving pods off of the endpoints for debugging and maintenance by updating the labels on the pod so that it doesn’t match the selector. In order for us to update a service selector so that pods can be removed from it we will need to have a selector that can be easily updated. In order to do that we’ll add a label that we can toggle to take any of our pods out of service.
Let’s create a Deployment with an enabled label:
apiVersion: extensions/v1beta1
kind: Deployment
metadata:
    name: nginx
spec:
    template:
        metadata:
            labels:
                name: nginx
                enabled: "true"
        spec:
            containers:
                - name: nginx
                  image: nginx
In our service we will use these labels in our selector:
apiVersion: v1
kind: Service
metadata:
    labels:
        name: nginx
    name: nginx
spec:
    ports:
        - name: http
          port: 80
          targetPort: 80
    selector:
        name: nginx
        enabled: "true"
After we create our deployment and service we would have some pods running.
$ kubectl get pods nginx
NAME                     READY     STATUS    RESTARTS   AGE
nginx-1802606028-1posu   1/1       Running   0          27s
nginx-1802606028-yjoty   1/1       Running   0          27s
We can list the pod endpoints here too.
$ kubectl get endpoints nginx
NAME      ENDPOINTS                   AGE
nginx     10.40.3.6:80,10.40.3.7:80   22m
Let’s take the pod nginx-1802606028-1posu out for maintenance. First let’s
note it’s pod IP.
$ kubectl get pods -o jsonpath='{.items[?(@.metadata.name=="nginx-1802606028-1posu")].status.podIP}'
10.40.3.7
Now, to put the pod under maintenance we can change the enabled label to
something other than "true". We need to pass the --overwrite flag to update
an existing label.
$ kubectl label pod nginx-1802606028-1posu enabled=false --overwrite
pod "nginx-1802606028-1posu" labeled
If we check the endpoints again we would notice that we still have two endpoints. This is because the deployment has recognized based on it’s own selector that it should start another pod.
$ kubectl get pods --show-labels
NAME                     READY     STATUS    RESTARTS   AGE       LABELS
nginx-1802606028-1posu   1/1       Running   0          5m        enabled=false,name=nginx,pod-template-hash=1802606028
nginx-1802606028-fl33g   1/1       Running   0          2m        enabled=true,name=nginx,pod-template-hash=1802606028
nginx-1802606028-yjoty   1/1       Running   0          5m        enabled=true,name=nginx,pod-template-hash=1802606028
We can notice here that our pod under maintenance is no longer in the endpoints.
$ kubectl get endpoints
NAME      ENDPOINTS                   AGE
nginx     10.40.3.6:80,10.40.3.8:80   25m
We can now do maintenance on our pod.
Performing Maintenance
How you perform maintenance on your pod will be highly application specific so I won’t go into it a whole lot here. However, Kubernetes provides a few features that make it easy to connect to applications running in your cluster so I’ll mention those briefly.
kubectl attach
You can attach to an running pod in order to send it data on stdin and get
debugging info on stdout. This is great if your process allows you to send it
commands on stdin to get info on it’s internal state. Some containers however,
don’t create a TTY. You will be able to see stdout but this is very close to
just using kubectl logs.
$ kubectl attach nginx-1802606028-1posu -it
Unable to use a TTY - container nginx did not allocate one
127.0.0.1 - - [13/Sep/2016:02:51:06 +0000] "GET / HTTP/1.1" 200 612 "-" "Mozilla/5.0 (Macintosh; Intel Mac OS X 10_11_6) AppleWebKit/537.36 (KHTML, like Gecko) Chrome/53.0.2785.101 Safari/537.36" "-"
2016/09/13 02:51:07 [error] 5#5: *1 open() "/usr/share/nginx/html/favicon.ico" failed (2: No such file or directory), client: 127.0.0.1, server: localhost, request: "GET /favicon.ico HTTP/1.1", host: "localhost:8000", referrer: "http://localhost:8000/"
127.0.0.1 - - [13/Sep/2016:02:51:07 +0000] "GET /favicon.ico HTTP/1.1" 404 571 "http://localhost:8000/" "Mozilla/5.0 (Macintosh; Intel Mac OS X 10_11_6) AppleWebKit/537.36 (KHTML, like Gecko) Chrome/53.0.2785.101 Safari/537.36" "-"
kubectl exec
kubectl exec allows you to execute a command in a container. You can use this
to do any number of things, but perhaps you might use it to send a signal to a
process in the container.
kubectl exec nginx-1802606028-1posu -- killall -HUP nginx
Or you could just start up a bash shell if bash is installed.
kubectl exec nginx-1802606028-1posu -ti -- bash -il
kubectl port-forward
Another useful feature is port forwarding. We can use this to forward a local port to our pod so we can send it requests and see how it responds.
$ kubectl port-forward nginx-1802606028-1posu 8000:80
Forwarding from 127.0.0.1:8000 -> 80
Forwarding from [::1]:8000 -> 80
After that we can send it requests from another terminal.
$ curl http://localhost:8000/
<!DOCTYPE html>
<html>
<head>
<title>Welcome to nginx!</title>
<style>
    body {
        width: 35em;
        margin: 0 auto;
        font-family: Tahoma, Verdana, Arial, sans-serif;
    }
</style>
</head>
<body>
<h1>Welcome to nginx!</h1>
<p>If you see this page, the nginx web server is successfully installed and
working. Further configuration is required.</p>

<p>For online documentation and support please refer to
<a href="http://nginx.org/">nginx.org</a>.<br/>
Commercial support is available at
<a href="http://nginx.com/">nginx.com</a>.</p>

<p><em>Thank you for using nginx.</em></p>
</body>
</html>
Wrap up
Label selectors make it easy to take pods out for maintenance. There are some things you need to keep in mind though.
Services and Deployments
Because Services and Deployments often both use label selectors it is possible
to take a pod out for maintenance but leave it as part of the Deployment. This
is fine in many circumstances, but if you have a Deployment with a
HorizontalPodAutoscaler,
the Deployment could scale down and delete your pod at any time. Also, while a
single pod taken out of service isn’t much, it still may have a performance
impact on your application. For these reasons I would suggest taking it out of
the Deployment as well and have the Deployment start up a replacement pod.
Putting Pods back into Service
After we are done maintenance on our pod we may want to put it back into the service. You can do this by updating the label again to match the service selector.
$ kubectl label pod nginx-1802606028-1posu enabled=true --overwrite
pod "nginx-1802606028-1posu" labeled
This is great if your pod is part of a
PetSet or restarting it is hard.
But if we are using Deployments, and since the pod was acting flaky to begin
with, and pods in a Deployment are by definition replaceable, we should probably
just delete the pod. Even if we added it back to the Deployment, the Deployment
would notice that it has one too many pods and delete one anyway.
If you keep these things in mind, finding out why a particular pod was acting up in production can be a relatively smooth experience.